Black Friday Sale! Don’t miss this limited-time offer. Only until December 14th
Big Brake Kits
Big Brake Limited Warranty Policy
BGR Forged Big Brake Upgrade: Limited Warranty Policy
At BGR Forged, we stand behind the engineering and quality of our high-performance braking systems. Below is the comprehensive warranty coverage for our Big Brake Kits. Please review these terms to understand your coverage and responsibilities as an owner.
Component Coverage Periods
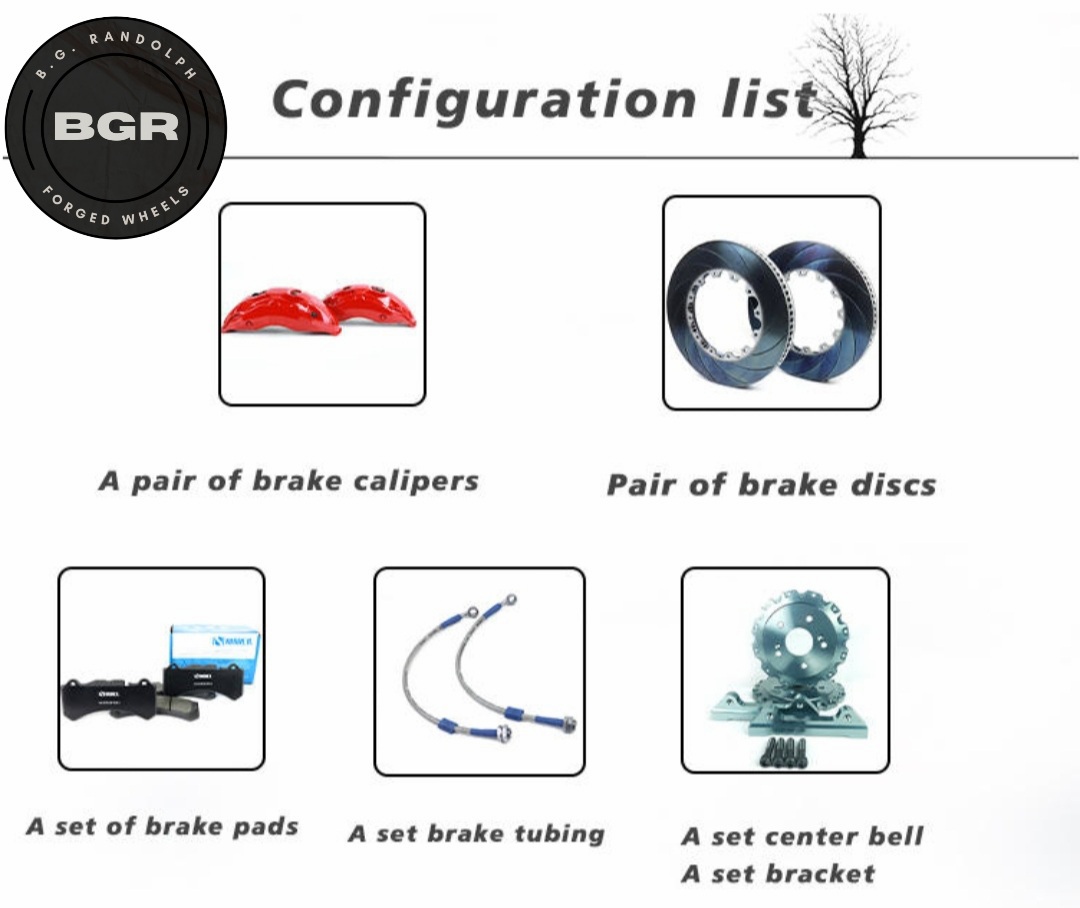
Brake Calipers: 1-Year Limited Warranty Our brake calipers are warrantied for a period of one (1) year from the date of purchase.
Coverage includes: Piston oil leakage and structural brake caliper deformation.
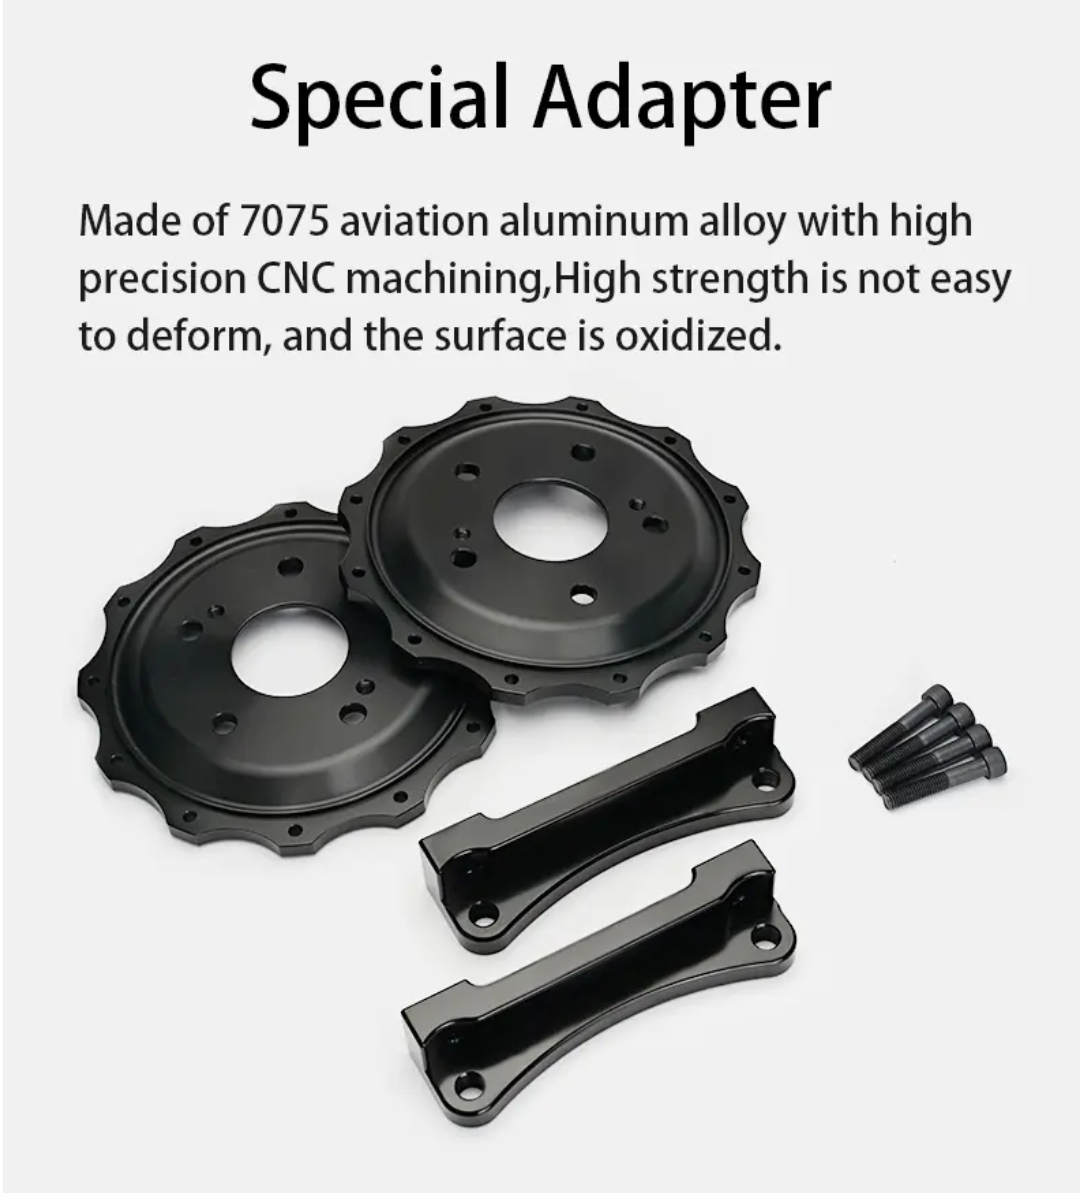
Caliper Mounting Brackets: 1-Year Limited Warranty The caliper mounting brackets are warrantied for a period of one (1) year from the date of purchase.
Coverage includes: Structural deformation or failure of the bracket geometry.
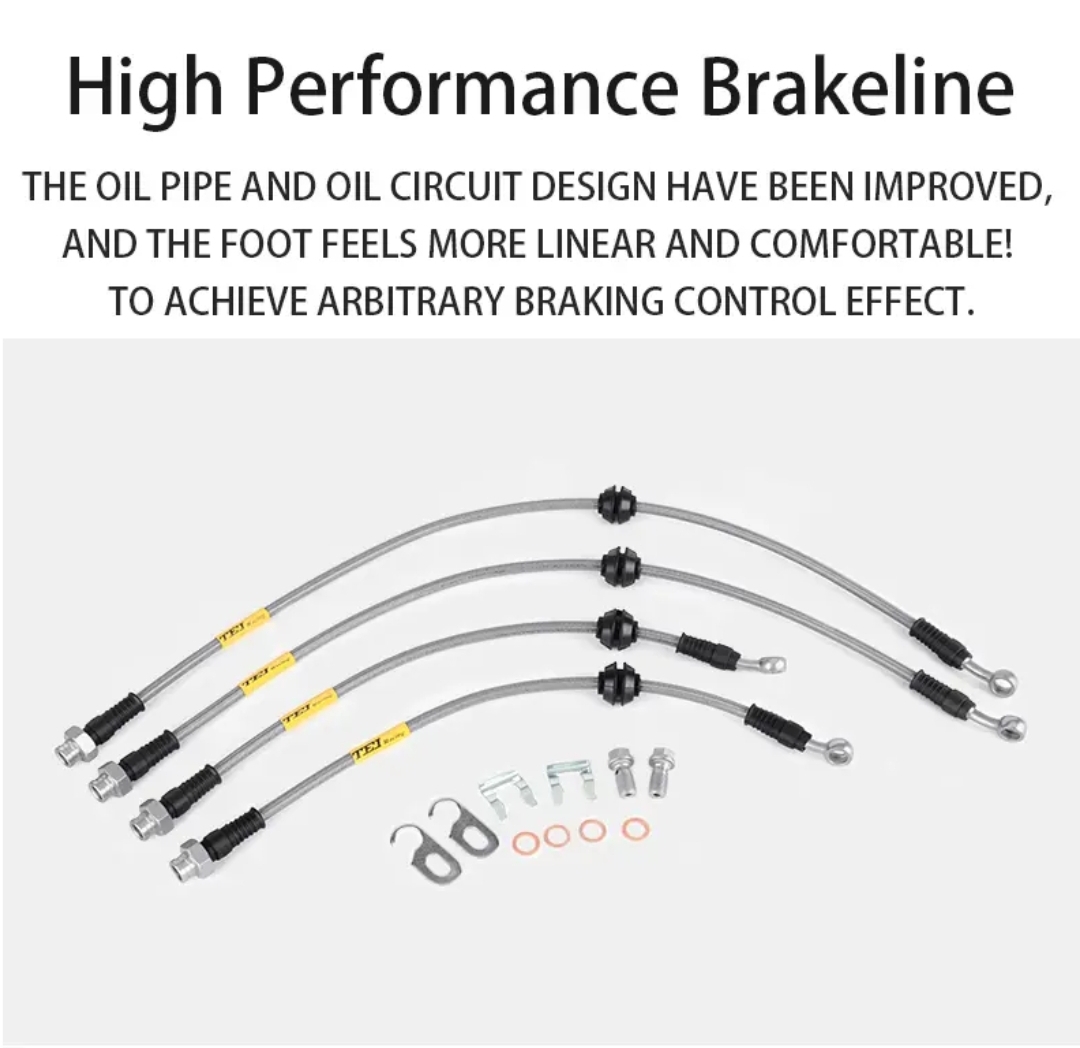
Flexible Brake Hoses: 1-Year Limited Warranty Stainless steel braided or rubber flexible brake hoses are warrantied for a period of one (1) year from the date of purchase.
Coverage includes: Cracking, casing fractures, and oil/fluid leakage.
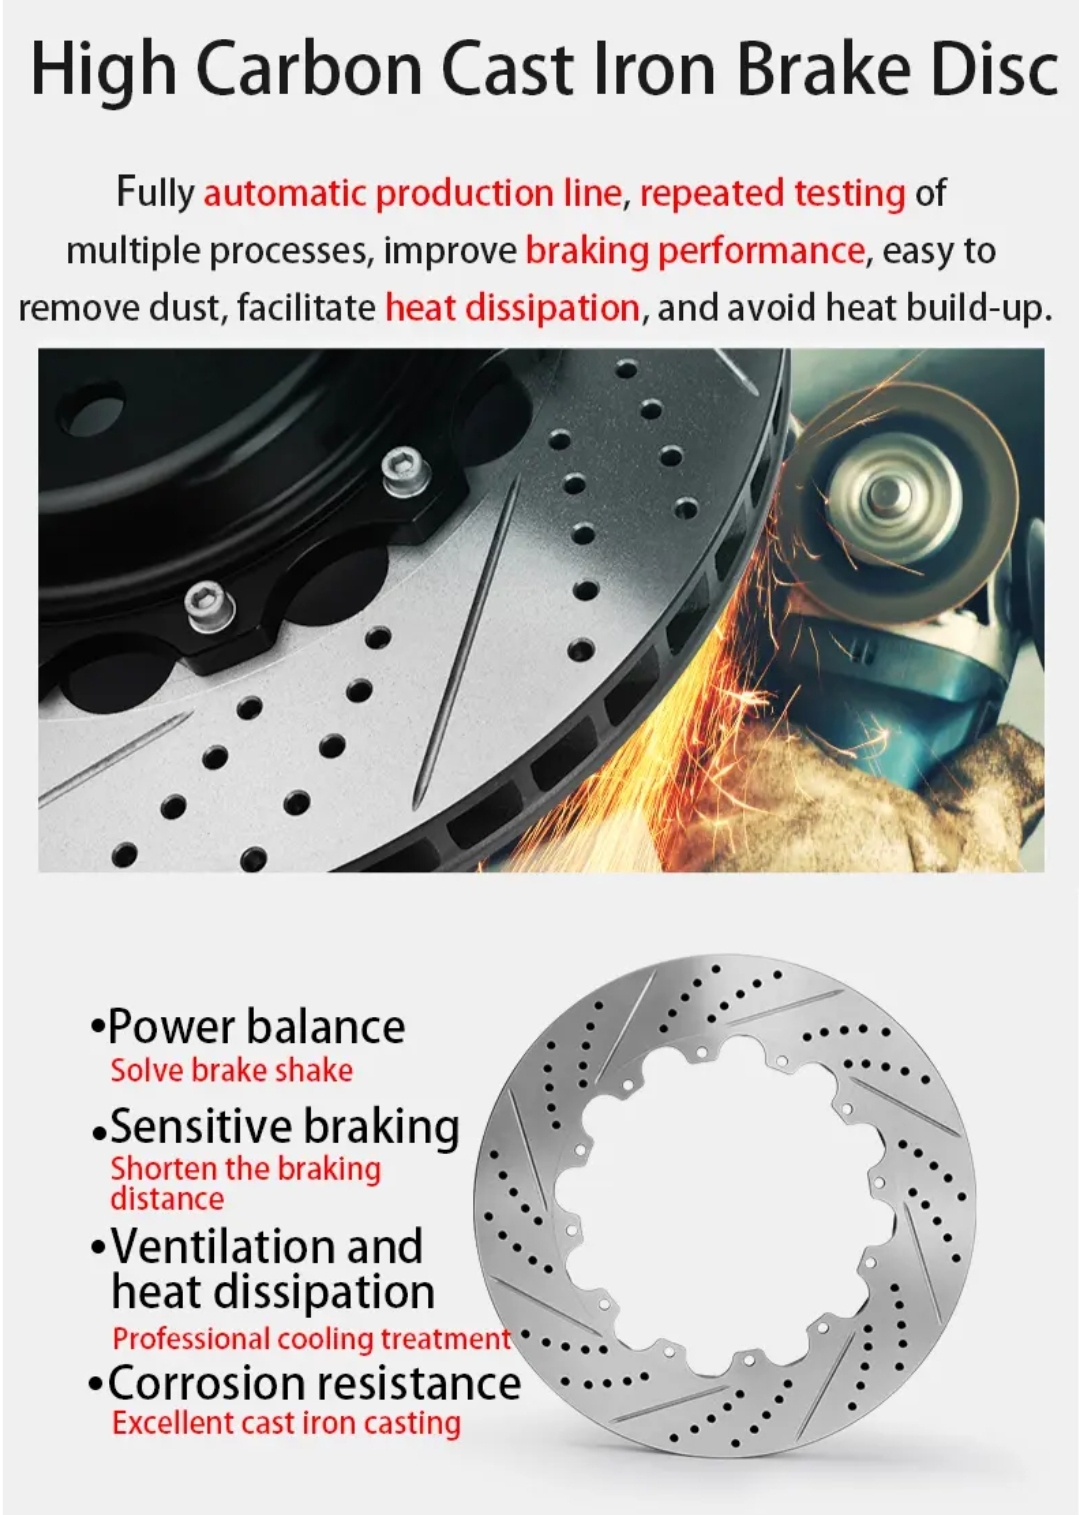
Brake Rotors: 5-Month Limited Warranty Our high-performance rotors are warrantied for a period of five (5) months from the date of purchase.
Coverage includes: Rotor warping and structural deformation.
Brake Pads: 5-Month Limited Warranty Brake pads are warrantied for a period of five (5) months from the date of purchase.
Coverage includes: Defects in material or workmanship.
Note: Normal wear and tear from use is not considered a defect.
Critical Operational Requirements
Mandatory Break-In Procedure To ensure optimal performance and longevity, newly installed brake pads require a specific break-in (bedding) procedure to correctly seat the friction material to the rotor surface. Failure to properly bed-in your brakes can result in poor performance, glazing, or vibration. Damage resulting from a failure to follow the break-in procedure is not covered under warranty.
Exclusions & Limitations
The following conditions are NOT covered under the BGR Forged Limited Warranty:
Cosmetic Finishes: There is no warranty coverage on any item with a powder coat finish. BGR Forged is not responsible for chipping, fading, or discoloration of the finish due to heat cycling, road debris, or chemical cleaners.
Improper Installation: Any component that has been installed incorrectly, contrary to factory specifications, or by an unqualified technician is void of all warranty coverage.
Brake Noise: Squeaky brake pads or brake noise are not considered a defect. High-performance friction compounds often generate noise as a trade-off for increased stopping power and heat management.
Track Use & Abuse: Unless explicitly stated otherwise for specific race-application parts, damage resulting from competitive racing, accidents, or off-road abuse is not covered.
Big Brake Installation Torque Specifications
BGR Forged: Installation Torque Specifications
WARNING: Correct torque specifications are critical for the safety and performance of your vehicle.
Do not guess.
Do not use an impact gun for final tightening.
Always use a calibrated torque wrench.
Unless otherwise noted, all torque values assume clean, dry threads. If using anti-seize or thread lubricant, torque values must be reduced by 20-30% to prevent over-stretching the bolts.
1. Wheel Installation (Lug Nuts)
Retorque required after the first 50 miles of driving.
Bolt / Stud Size Typical Torque Range (ft-lbs) Typical Torque Range (Nm)
M12 x 1.25 / 1.5 75 – 85 ft-lbs 100 – 115 Nm
M14 x 1.25 / 1.5 90 – 100 ft-lbs 120 – 135 Nm
1/2″ Studs 90 – 100 ft-lbs 120 – 135 Nm
Truck Specs (8-Lug) 130 – 150 ft-lbs 175 – 200 Nm
Export to Sheets
Note: Always refer to your vehicle owner’s manual for the specific manufacturer requirement.
2. Brake System Installation
Use Blue Threadlocker (Medium Strength) on Caliper Mounting Bolts.
Component Description Torque Spec (ft-lbs)
Caliper Bracket to Spindle Bolts holding the bracket to the car. Refer to OEM Factory Manual
Radial Mount Studs/Nuts Nuts holding the caliper to the bracket. 50 – 60 ft-lbs (Verify with Kit Specs)
Banjo Bolt Brake line to Caliper connection. 15 – 20 ft-lbs (Do not overtighten)
Bleeder Screw Small screw for bleeding air. 10 – 13 ft-lbs (Snug only)
Export to Sheets
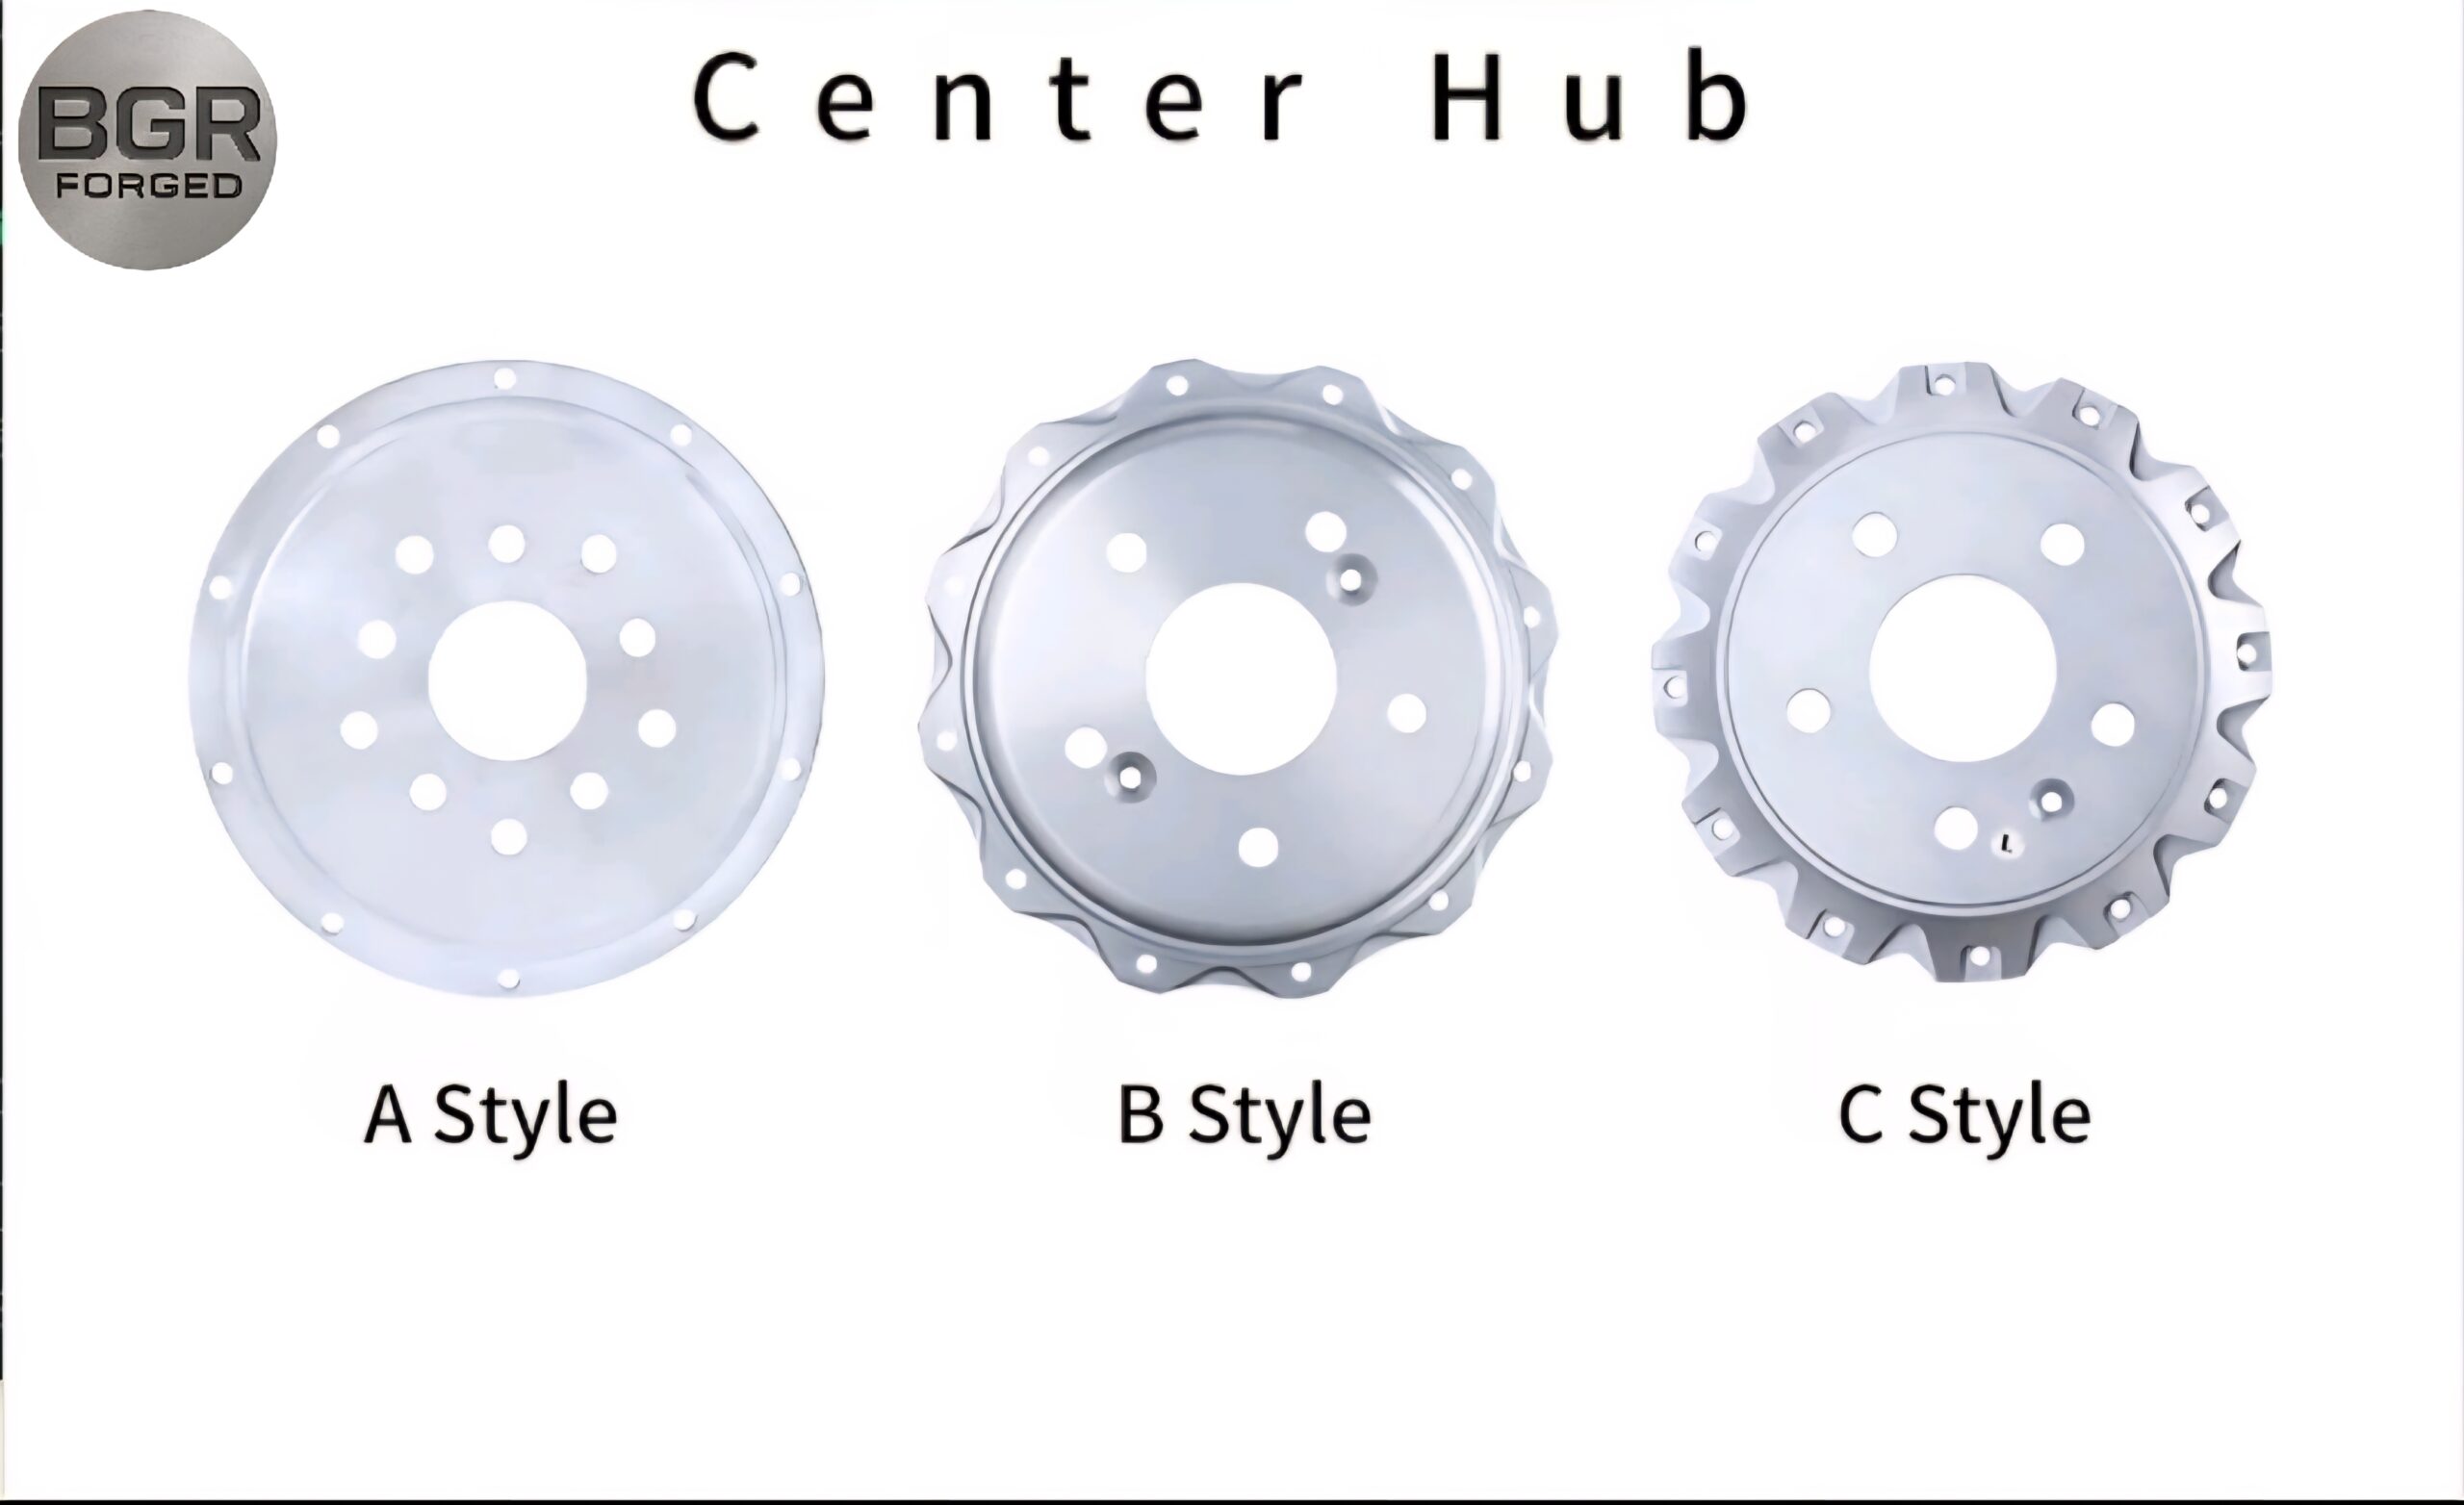
3. Rotor Assembly (For 2-Piece Rotors Only)
If you are assembling the rotor ring to the hat yourself. DO NOT touch these if the rotor came pre-assembled.
Component Specification Notes
Rotor Hat to Ring Bolts 10 – 12 ft-lbs (120-140 in-lbs) Must use Red Loctite (High Temp)
Export to Sheets
4. Safety Checklist
Before driving, please verify:
[ ] All fasteners have been torqued to specification.
[ ] Brake pedal is firm (system has been properly bled).
[ ] Wheel spins freely without contacting the caliper or suspension.
[ ] Steering wheel turns lock-to-lock without brake line tension.
Brake Pad Break In Procedure
IMPORTANT: Mandatory Brake Break-In Procedure
ATTENTION: To achieve maximum performance and longevity from your BGR Forged Big Brake Kit, you must perform the following bedding procedure immediately after installation.
Why is this necessary? Bedding (or “breaking in”) your brakes deposits a thin, even layer of friction material from the brake pads onto the face of the rotor. This transfer layer is essential for:
Maximizing Stopping Power: Creates the necessary friction interface.
preventing Vibration: Uneven pad deposits are the #1 cause of “warped” rotor sensations.
Ensuring Warranty Coverage: As stated in our warranty policy, damage resulting from improper break-in is not covered.
Safety First
Perform this procedure on a dry, open stretch of road where you can safely accelerate and decelerate without obstructing traffic.
Do not perform this on wet or icy roads.
Always obey local traffic laws.
The Step-by-Step Guide
Step 1: Gentle Warm-Up
Drive the vehicle for a few minutes at moderate speeds (30-40 MPH). Apply the brakes gently a few times to bring the rotors and pads up to a baseline operating temperature. Do not slam on the brakes yet.
Step 2: The Bedding Cycle
Perform a series of 8 to 10 consecutive stops.
Accelerate to approximately 60 MPH.
Firmly apply the brakes to slow down to 15 MPH.
DO NOT come to a complete stop.
Accelerate back up to 60 MPH immediately and repeat.
Note: You want to apply firm pedal pressure (about 80% braking effort), but try to avoid engaging the ABS system.
Step 3: The Cool Down (Critical)
After your last deceleration cycle, you must cool the system down.
Drive the vehicle for at least 5 to 10 minutes at moderate speed (45-55 MPH) with little to no braking.
The airflow will cool the rotors and calipers.
Do not sit stopped with your foot on the brake pedal during this time, as this can “imprint” hot pads onto the hot rotor, causing vibration later.
Step 4: Final Park
Bring the vehicle to a stop and park it.
DO NOT engage the Emergency/Parking Brake immediately after this hot cycle. The rear shoes/pads can fuse to the hot drum/rotor.
Allow the vehicle to sit until the brakes have cooled to ambient temperature (usually 1 hour).
What to Expect During Bedding
Smell: You may smell a strong “burning” odor. This is the resins in the brake pads curing. This is normal.
Smoke: Slight smoking from the wheel well area is normal during the heavy braking cycle.
Rotor Appearance: Your rotors may turn a light blue or gray color. This indicates a successful transfer of pad material.
Troubleshooting
If you feel severe vibration immediately: You may have stopped completely while the brakes were too hot. Drive the car to cool it down and attempt a milder re-bedding cycle later.
Squeaking: Some noise is normal with high-performance pads, especially before the transfer layer is fully established.
Understanding Brake Noise
Understanding Brake Noise: Performance vs. Comfort
“Why do my high-performance brakes squeak?” This is the most common question we receive from new Big Brake Kit owners. The short answer is: Noise is often a sign that your brakes are working exactly as designed.
The Trade-Off: Friction vs. Silence Standard factory cars use “organic” or soft ceramic brake pads designed for one thing: silence. To achieve this, they sacrifice bite and heat resistance.
BGR Forged brake kits are designed for performance. We use high-friction compounds capable of stopping heavy vehicles from high speeds repeatedly without fading.
High Friction Coefficient: Our pads “bite” the rotor much harder than standard pads.
Resonance: This aggressive bite causes high-frequency vibrations (harmonics) between the pad and rotor. Your ears perceive this vibration as a “squeak.”
Common Causes of Noise:
Cold Temperatures: High-performance pads often need a little heat to operate silently. You may hear more noise in the morning or during the first few stops of a drive.
Brake Dust Buildup: Performance pads generate dust. If this dust accumulates between the pad and rotor, it can cause squealing. Regular wheel cleaning often solves this.
Glazing: If the brakes were not bedded-in properly (see our Break-In Procedure), the surface of the pad can “glaze” or harden, leading to noise.
The Bottom Line A squeaky brake is not a broken brake. It is the sound of high-friction material doing its job. As stated in our Warranty Policy, brake noise is not considered a defect and is not covered by warranty.
Big Brake Cleaning & Care Guide
Protect Your Investment: Cleaning & Care Guide
You have invested in premium BGR Forged custom wheels and high-performance brakes. These are precision-engineered components finished with high-quality powder coats, paints, or polishing. To keep them looking showroom-new, they require specific care.
Please Read Carefully: Damage caused by improper cleaning, neglect, or the use of harsh chemicals is not covered under the BGR Forged warranty.
The Golden Rules
NEVER Use Acidic Cleaners: Avoid any wheel cleaner labeled as “Acid-Based,” “Heavy Duty,” or “Spray-on-Rinse-off.” These chemicals can eat through clear coats, stain anodized finishes, and dull powder coats instantly. Use only pH-Neutral automotive shampoo.
NEVER Wash Hot: Do not wash your wheels or brakes immediately after driving. Cold water on hot metal can cause the brake rotors to warp and the wheel finish to stain or crack. Allow the vehicle to cool to the touch before washing.
Avoid Automatic Car Washes: The stiff bristles in automatic tunnels can scratch your wheel finish, and the “Wheel Cleaner” jets often use highly acidic or caustic chemicals to strip brake dust.
Recommended Cleaning Process
Rinse Thoroughly: Blast away loose brake dust and road grime with a hose.
Soak: Use a dedicated bucket with water and pH-Neutral Car Soap.
Agitate Gently: Use a soft microfiber wash mitt or a high-quality soft-bristle wheel brush.
Tip: Use a separate mitt for your wheels than the one you use for your car’s paint to avoid scratching your bodywork with brake dust.
Clean the Calipers: Gently wipe the powder-coated brake calipers with the soapy mitt.
Rinse & Dry: Rinse off all soap. Dry immediately with a clean microfiber towel or forced air. Allowing water to air-dry leads to hard water spots that can etch the finish.
Pro-Tip: Ceramic Coating
We highly recommend applying a Ceramic Coating to both your BGR Forged wheels and brake calipers.
Easier Cleaning: The hydrophobic barrier prevents brake dust from sticking, allowing you to rinse most grime away with just water.
Protection: It adds a layer of defense against UV rays, road salts, and chemical fallout.
Big Brake Limited Warranty Policy
BGR Forged Big Brake Upgrade: Limited Warranty Policy
At BGR Forged, we stand behind the engineering and quality of our high-performance braking systems. Below is the comprehensive warranty coverage for our Big Brake Kits. Please review these terms to understand your coverage and responsibilities as an owner.
Component Coverage Periods
Brake Calipers: 1-Year Limited Warranty Our brake calipers are warrantied for a period of one (1) year from the date of purchase.
Coverage includes: Piston oil leakage and structural brake caliper deformation.
Caliper Mounting Brackets: 1-Year Limited Warranty The caliper mounting brackets are warrantied for a period of one (1) year from the date of purchase.
Coverage includes: Structural deformation or failure of the bracket geometry.
Flexible Brake Hoses: 1-Year Limited Warranty Stainless steel braided or rubber flexible brake hoses are warrantied for a period of one (1) year from the date of purchase.
Coverage includes: Cracking, casing fractures, and oil/fluid leakage.
Brake Rotors: 5-Month Limited Warranty Our high-performance rotors are warrantied for a period of five (5) months from the date of purchase.
Coverage includes: Rotor warping and structural deformation.
Brake Pads: 5-Month Limited Warranty Brake pads are warrantied for a period of five (5) months from the date of purchase.
Coverage includes: Defects in material or workmanship.
Note: Normal wear and tear from use is not considered a defect.
Critical Operational Requirements
Mandatory Break-In Procedure To ensure optimal performance and longevity, newly installed brake pads require a specific break-in (bedding) procedure to correctly seat the friction material to the rotor surface. Failure to properly bed-in your brakes can result in poor performance, glazing, or vibration. Damage resulting from a failure to follow the break-in procedure is not covered under warranty.
Exclusions & Limitations
The following conditions are NOT covered under the BGR Forged Limited Warranty:
Cosmetic Finishes: There is no warranty coverage on any item with a powder coat finish. BGR Forged is not responsible for chipping, fading, or discoloration of the finish due to heat cycling, road debris, or chemical cleaners.
Improper Installation: Any component that has been installed incorrectly, contrary to factory specifications, or by an unqualified technician is void of all warranty coverage.
Brake Noise: Squeaky brake pads or brake noise are not considered a defect. High-performance friction compounds often generate noise as a trade-off for increased stopping power and heat management.
Track Use & Abuse: Unless explicitly stated otherwise for specific race-application parts, damage resulting from competitive racing, accidents, or off-road abuse is not covered.
Big Brake Installation Torque Specifications
BGR Forged: Installation Torque Specifications
WARNING: Correct torque specifications are critical for the safety and performance of your vehicle.
Do not guess.
Do not use an impact gun for final tightening.
Always use a calibrated torque wrench.
Unless otherwise noted, all torque values assume clean, dry threads. If using anti-seize or thread lubricant, torque values must be reduced by 20-30% to prevent over-stretching the bolts.
1. Wheel Installation (Lug Nuts)
Retorque required after the first 50 miles of driving.
Bolt / Stud Size Typical Torque Range (ft-lbs) Typical Torque Range (Nm)
M12 x 1.25 / 1.5 75 – 85 ft-lbs 100 – 115 Nm
M14 x 1.25 / 1.5 90 – 100 ft-lbs 120 – 135 Nm
1/2″ Studs 90 – 100 ft-lbs 120 – 135 Nm
Truck Specs (8-Lug) 130 – 150 ft-lbs 175 – 200 Nm
Export to Sheets
Note: Always refer to your vehicle owner’s manual for the specific manufacturer requirement.
2. Brake System Installation
Use Blue Threadlocker (Medium Strength) on Caliper Mounting Bolts.
Component Description Torque Spec (ft-lbs)
Caliper Bracket to Spindle Bolts holding the bracket to the car. Refer to OEM Factory Manual
Radial Mount Studs/Nuts Nuts holding the caliper to the bracket. 50 – 60 ft-lbs (Verify with Kit Specs)
Banjo Bolt Brake line to Caliper connection. 15 – 20 ft-lbs (Do not overtighten)
Bleeder Screw Small screw for bleeding air. 10 – 13 ft-lbs (Snug only)
Export to Sheets
3. Rotor Assembly (For 2-Piece Rotors Only)
If you are assembling the rotor ring to the hat yourself. DO NOT touch these if the rotor came pre-assembled.
Component Specification Notes
Rotor Hat to Ring Bolts 10 – 12 ft-lbs (120-140 in-lbs) Must use Red Loctite (High Temp)
Export to Sheets
4. Safety Checklist
Before driving, please verify:
[ ] All fasteners have been torqued to specification.
[ ] Brake pedal is firm (system has been properly bled).
[ ] Wheel spins freely without contacting the caliper or suspension.
[ ] Steering wheel turns lock-to-lock without brake line tension.
Brake Pad Break In Procedure
IMPORTANT: Mandatory Brake Break-In Procedure
ATTENTION: To achieve maximum performance and longevity from your BGR Forged Big Brake Kit, you must perform the following bedding procedure immediately after installation.
Why is this necessary? Bedding (or “breaking in”) your brakes deposits a thin, even layer of friction material from the brake pads onto the face of the rotor. This transfer layer is essential for:
Maximizing Stopping Power: Creates the necessary friction interface.
preventing Vibration: Uneven pad deposits are the #1 cause of “warped” rotor sensations.
Ensuring Warranty Coverage: As stated in our warranty policy, damage resulting from improper break-in is not covered.
Safety First
Perform this procedure on a dry, open stretch of road where you can safely accelerate and decelerate without obstructing traffic.
Do not perform this on wet or icy roads.
Always obey local traffic laws.
The Step-by-Step Guide
Step 1: Gentle Warm-Up
Drive the vehicle for a few minutes at moderate speeds (30-40 MPH). Apply the brakes gently a few times to bring the rotors and pads up to a baseline operating temperature. Do not slam on the brakes yet.
Step 2: The Bedding Cycle
Perform a series of 8 to 10 consecutive stops.
Accelerate to approximately 60 MPH.
Firmly apply the brakes to slow down to 15 MPH.
DO NOT come to a complete stop.
Accelerate back up to 60 MPH immediately and repeat.
Note: You want to apply firm pedal pressure (about 80% braking effort), but try to avoid engaging the ABS system.
Step 3: The Cool Down (Critical)
After your last deceleration cycle, you must cool the system down.
Drive the vehicle for at least 5 to 10 minutes at moderate speed (45-55 MPH) with little to no braking.
The airflow will cool the rotors and calipers.
Do not sit stopped with your foot on the brake pedal during this time, as this can “imprint” hot pads onto the hot rotor, causing vibration later.
Step 4: Final Park
Bring the vehicle to a stop and park it.
DO NOT engage the Emergency/Parking Brake immediately after this hot cycle. The rear shoes/pads can fuse to the hot drum/rotor.
Allow the vehicle to sit until the brakes have cooled to ambient temperature (usually 1 hour).
What to Expect During Bedding
Smell: You may smell a strong “burning” odor. This is the resins in the brake pads curing. This is normal.
Smoke: Slight smoking from the wheel well area is normal during the heavy braking cycle.
Rotor Appearance: Your rotors may turn a light blue or gray color. This indicates a successful transfer of pad material.
Troubleshooting
If you feel severe vibration immediately: You may have stopped completely while the brakes were too hot. Drive the car to cool it down and attempt a milder re-bedding cycle later.
Squeaking: Some noise is normal with high-performance pads, especially before the transfer layer is fully established.
Understanding Brake Noise
Understanding Brake Noise: Performance vs. Comfort
“Why do my high-performance brakes squeak?” This is the most common question we receive from new Big Brake Kit owners. The short answer is: Noise is often a sign that your brakes are working exactly as designed.
The Trade-Off: Friction vs. Silence Standard factory cars use “organic” or soft ceramic brake pads designed for one thing: silence. To achieve this, they sacrifice bite and heat resistance.
BGR Forged brake kits are designed for performance. We use high-friction compounds capable of stopping heavy vehicles from high speeds repeatedly without fading.
High Friction Coefficient: Our pads “bite” the rotor much harder than standard pads.
Resonance: This aggressive bite causes high-frequency vibrations (harmonics) between the pad and rotor. Your ears perceive this vibration as a “squeak.”
Common Causes of Noise:
Cold Temperatures: High-performance pads often need a little heat to operate silently. You may hear more noise in the morning or during the first few stops of a drive.
Brake Dust Buildup: Performance pads generate dust. If this dust accumulates between the pad and rotor, it can cause squealing. Regular wheel cleaning often solves this.
Glazing: If the brakes were not bedded-in properly (see our Break-In Procedure), the surface of the pad can “glaze” or harden, leading to noise.
The Bottom Line A squeaky brake is not a broken brake. It is the sound of high-friction material doing its job. As stated in our Warranty Policy, brake noise is not considered a defect and is not covered by warranty.
Big Brake Cleaning & Care Guide
Protect Your Investment: Cleaning & Care Guide
You have invested in premium BGR Forged custom wheels and high-performance brakes. These are precision-engineered components finished with high-quality powder coats, paints, or polishing. To keep them looking showroom-new, they require specific care.
Please Read Carefully: Damage caused by improper cleaning, neglect, or the use of harsh chemicals is not covered under the BGR Forged warranty.
The Golden Rules
NEVER Use Acidic Cleaners: Avoid any wheel cleaner labeled as “Acid-Based,” “Heavy Duty,” or “Spray-on-Rinse-off.” These chemicals can eat through clear coats, stain anodized finishes, and dull powder coats instantly. Use only pH-Neutral automotive shampoo.
NEVER Wash Hot: Do not wash your wheels or brakes immediately after driving. Cold water on hot metal can cause the brake rotors to warp and the wheel finish to stain or crack. Allow the vehicle to cool to the touch before washing.
Avoid Automatic Car Washes: The stiff bristles in automatic tunnels can scratch your wheel finish, and the “Wheel Cleaner” jets often use highly acidic or caustic chemicals to strip brake dust.
Recommended Cleaning Process
Rinse Thoroughly: Blast away loose brake dust and road grime with a hose.
Soak: Use a dedicated bucket with water and pH-Neutral Car Soap.
Agitate Gently: Use a soft microfiber wash mitt or a high-quality soft-bristle wheel brush.
Tip: Use a separate mitt for your wheels than the one you use for your car’s paint to avoid scratching your bodywork with brake dust.
Clean the Calipers: Gently wipe the powder-coated brake calipers with the soapy mitt.
Rinse & Dry: Rinse off all soap. Dry immediately with a clean microfiber towel or forced air. Allowing water to air-dry leads to hard water spots that can etch the finish.
Pro-Tip: Ceramic Coating
We highly recommend applying a Ceramic Coating to both your BGR Forged wheels and brake calipers.
Easier Cleaning: The hydrophobic barrier prevents brake dust from sticking, allowing you to rinse most grime away with just water.
Protection: It adds a layer of defense against UV rays, road salts, and chemical fallout.